![The best way to set up VMware Instruments on Ubuntu: Step-by-step information [2025]](https://i1.wp.com/www.liquidweb.com/wp-content/uploads/2024/03/wmware-1.png?w=800&resize=800,369&ssl=1 "The best way to set up VMware Instruments on Ubuntu: Step-by-step information [2025]")
Working Ubuntu on a VMware digital machine with out VMware Instruments is like driving a sports activities automobile in first gear—certain, it really works, however you’re not getting the total expertise. Whether or not you’re tweaking a dev surroundings or managing VMs at scale, putting in VMware Instruments is a fast win that unlocks smoother efficiency, higher integration, and important options like clipboard sharing and drag-and-drop.
When you’re able to tighten up your VM workflow and get Ubuntu taking part in properly together with your host system, this walkthrough has you lined.
Tutorial necessities
To finish this tutorial, you’ll first want to make sure that you meet the next necessities.
- A pc, server, or digital machine that’s operating Ubuntu working system (OS) model 14.04 or later.
- Root entry or sudo entry to your Ubuntu OS to be able to set up new software program.
- An web connection to obtain the brand new software program.
If a number of of the listed necessities are unmet, it is best to tackle them first after which proceed.
3 strategies to Set up VMware Instruments on Ubuntu
You possibly can set up VMware Instruments on a machine operating Ubuntu in three alternative ways:
- Utilizing the Open VM Instruments Package deal to put in the VMware Instruments software program.
- Putting in the set of providers referred to as VMware Instruments by way of the graphical person interface (GUI).
- Making use of the terminal to put in VMware Instruments.
Listed here are the directions for all three …
Technique 1: Use the open VM instruments bundle to put in VMware instruments
Step 1A: Open the terminal
When you’re operating a GUI model of Ubuntu, use the sidebar or search bar to navigate to the Linux terminal.
You should utilize the keyboard shortcut Ctrl+Alt+T as one other different. Nonetheless, you’ll be able to skip this step in case you are operating a terminal model of Ubuntu.
Step 1B: Replace bundle info
Prior to installing VMware Instruments on Ubuntu, it is very important be certain that your working system has the most recent bundle info. To do that, you might want to use the under apt-get replace command, which is able to mechanically replace any outdated bundle info:
sudo apt-get replaceAs soon as this course of is full, you will notice the next message: Finished.
Step 1C: Set up VMware instruments on GUI-based Ubuntu
Now, you might be prepared to put in the Open VM Instruments bundle. Use the next command to put in it to a GUI-based model of Ubuntu:
sudo apt-get set up open-vm-tools-desktopStep 1D: Set up VMware instruments on terminal-based Ubuntu
If you’re utilizing a terminal-based model of Ubuntu, it is best to use the next command as a substitute:
sudo apt-get set up open-vm-toolsNon-obligatory: Reboot the machine
Lastly, reboot the system to finish the set up course of with the under command:
sudo rebootTechnique 2: Use the graphical person interface (GUI) to put in VMware instruments
This technique requires the usage of a VMware Workstation digital machine (VM) to put in VMware Instruments on a GUI-based model of Ubuntu.
Step 2A: Obtain VMware Workstation
For this technique, you’ll use VMware Workstation. When you don’t have it put in, you’ll be able to obtain it from its official web site. See the picture under for reference:
Step 2B: Run the set up
Run the set up file by opening the terminal and utilizing the next command. Ensure to interchange the $username and different directories with the proper path to your downloads listing:
sudo bash /residence/$username/Downloads/VMware-Participant-Full-17.0.2-21581411.x86_64.bundleSee the picture under for reference:

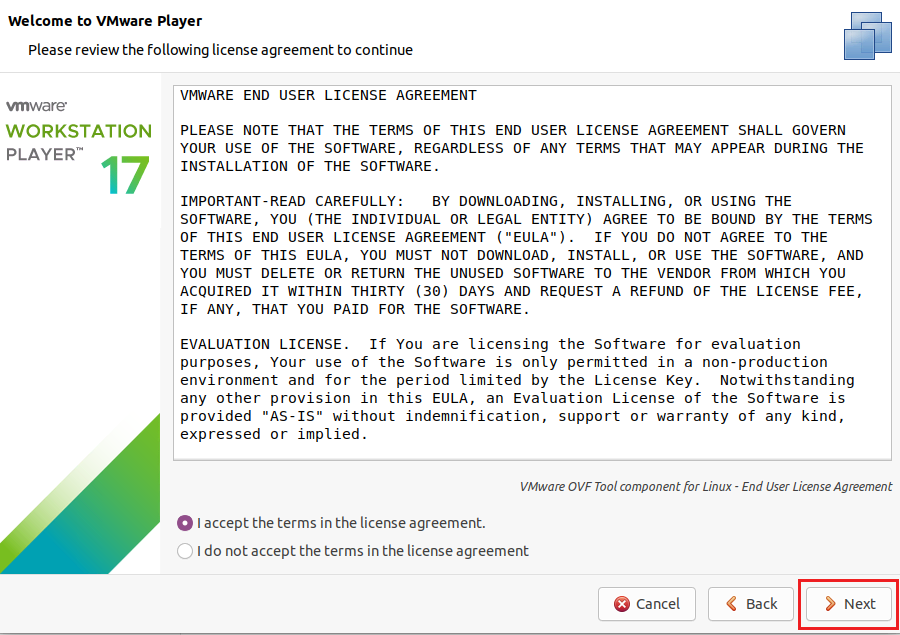
Step 2C: Set up VMware Workstation
Set up the software program by clicking the Subsequent button within the set up wizard till the method is full. Additionally, you will have the choice of selecting a free trial model. See the picture under for reference:
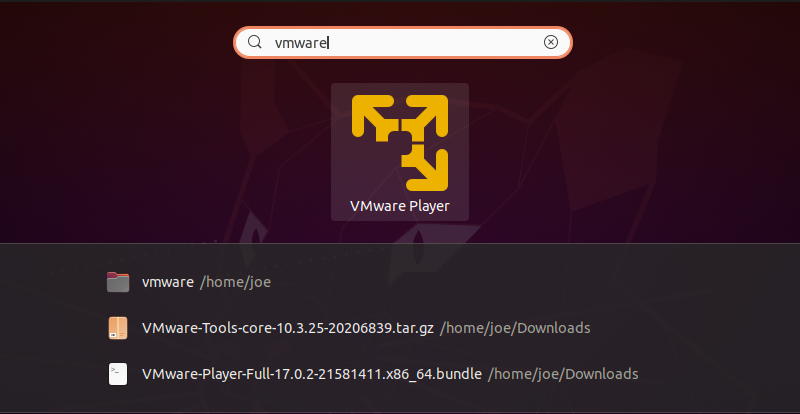
Step 2D: Open the VMware Workstation
Use the sidebar or search bar to open VMware Workstation. See the picture under for reference:
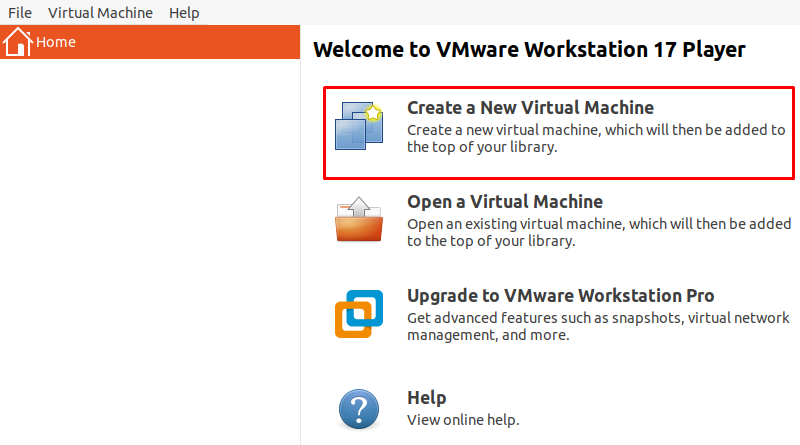
Step 2E: Use VMware Workstation to create a brand new Ubuntu digital machine
After you open the applying, choose the primary choice titled Create a New Digital Machine. You’ll then want to offer an Ubuntu picture to finish the setup wizard for the brand new machine. See the picture under for reference:
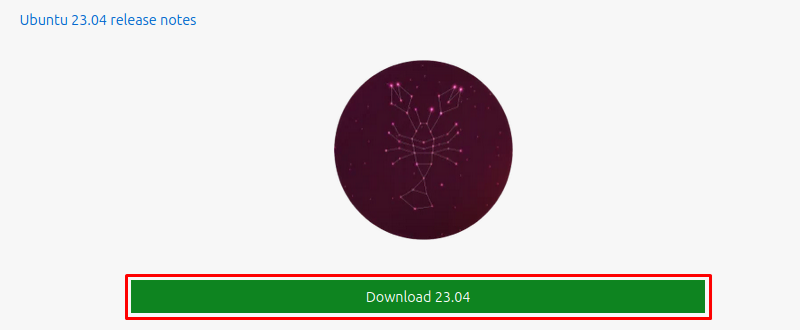
Step 2F: Obtain an Ubuntu picture
To create a digital machine, you want an Ubuntu picture. When you don’t have one, obtain it from the official web site. See the picture under for reference:
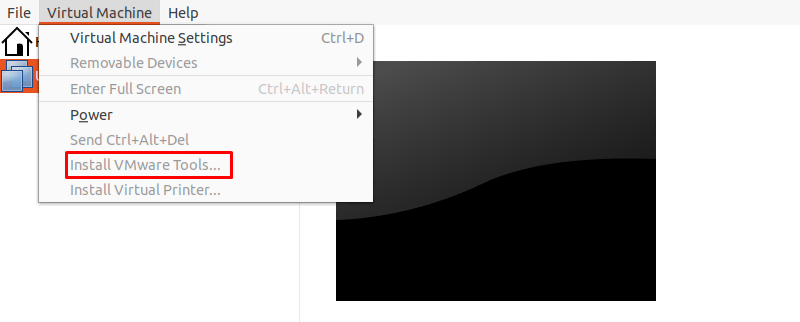
Step 2G: Begin the set up course of for VMware instruments
Now that you’ve got a digital Ubuntu machine operating in VMware Workstation, you’ll be able to set up VMware Instruments. Click on the Digital Machine menu merchandise in Workstation’s higher left menu after which Set up VMware Instruments. This motion will mount a brand new digital drive to your Ubuntu digital machine. See the picture under for reference:
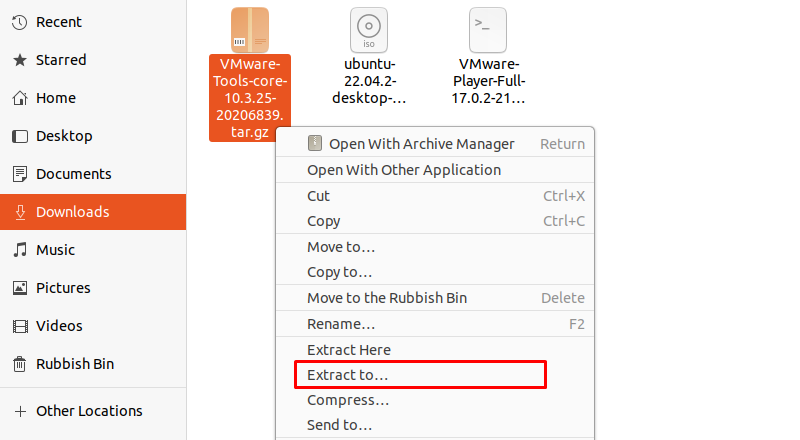
Step 2H: Extract the archive
Subsequent up, it is best to extract the VMware Instruments archive situated on the brand new digital disk. To do that, navigate to the archive utilizing the file explorer, right-click, and choose Extract To. See the picture under for reference:
Step 2I: Set up VMware instruments
Navigate to the listing the place you may have extracted the set up information and run the vmware-install.pl script:
sudo ./vmware-install.pl -fSee the picture under for reference:

Step 2J: Reboot the machine
Lastly, reboot your system to finish the set up course of with the under command:
sudo rebootSee the picture under for reference:

Technique 3: Use the terminal to put in VMware Instruments
This technique requires the usage of a VMware Workstation VM to put in VMware Instruments on a terminal-based model of Ubuntu. When you don’t at present have VMware Workstation put in, you first must observe steps from the second technique introduced above for its set up.
Step 3A: Mount the picture manually
Use the next two instructions to create a brand new mount level listing and mount the picture:
sudo mkdir -p /mnt/cdromsudo mount /dev/cdrom /mnt/cdromStep 3B: Open the picture
Then, open the picture listing and discover the archive:
cd /mnt/cdromStep 3C: Extract the archive
Extract the archive from the picture utilizing the next command. Ensure to interchange $VMwareTools with its full file title and $vacation spot together with your desired vacation spot for the extracted information:
sudo tar -xf $VMwareTools.tar.gz -C /$vacation spotStep 3D: Run the VMware Instruments set up
Now you can navigate to the script file and run the set up with the under:
sudo ./vmware-install.pl –fStep 3E: Reboot the machine
Lastly, reboot your system with the under command to finish the set up course of:
sudo rebootGetting began with VMWare on Ubuntu
VMware gives many advantages to the world of virtualization and cloud infrastructure. As talked about, amongst different issues, VMware Instruments permits higher administration of visitor digital machines and extends the communication capabilities between visitor and host machines.
Use whichever of those strategies is your favourite: All of them do the trick. The primary entails utilizing the Open VM Instruments bundle, whereas the second and third strategies benefit from VMware’s Workstation software program.
Do you want assist deciding on the most effective internet hosting firm on your particular wants? Do you want steering organising a good VMware internet hosting answer? Then you might be in the suitable place. Click on by under to discover choices or discuss with one in all our consultants proper now.
If you’re nonetheless uncertain if VMware is appropriate on your wants, check out Liquid Net’s sturdy devoted server plans. We additionally provide a variety of cloud-based server options, excellent for anybody seeking to maximize the flexibleness of VMware.
The publish The best way to set up VMware Instruments on Ubuntu: Step-by-step information [2025] appeared first on Liquid Net.