
Managing Linux servers typically means spending numerous hours on the command line, executing instructions, troubleshooting points, and fine-tuning configurations. For seasoned sysadmins and builders alike, effectivity on the terminal is vital to sustaining productiveness and minimizing errors. This is the reason bash historical past, a robust but typically underutilized function of the Linux command line, is tremendous useful.
Consider bash historical past as your terminal’s private assistant – a document of each command you’ve executed, able to be revisited, reused, or refined. Whether or not you’re debugging a crucial concern, repeating complicated instructions, or just trying to save time, mastering bash historical past can rework the way you handle your servers. But, many customers barely scratch the floor of what bash historical past can do.
This text will take you past the fundamentals of scrolling by way of previous instructions. By the top, you should have a toolkit of methods to streamline your workflow and enhance your Linux server administration productiveness.
Key factors
- Bash historical past data all of your executed instructions, making it a robust software for recalling, reusing, and refining instructions. This boosts productiveness and minimizes errors for Linux server directors.
- Use
historical pastto view previous instructions,grepto filter, and shortcuts like!!to rerun the final command or Ctrl+R for reverse searches. These options streamline server administration duties. - Grasp instructions like
!-Nto recall by place,!:$to retrieve the final argument, and^outdated^new^to right typos. Modifiers like:h,:t, and:rpermit exact path and filename changes. - Tailor bash historical past with settings like
HISTSIZEfor longer command logs,HISTIGNOREto exclude particular instructions, andHISTTIMEFORMATso as to add timestamps. Sync historical past throughout terminals withPROMPT_COMMAND. - Mix bash historical past mastery with Liquid Net’s highly effective Linux VPS internet hosting options and professional assist for safe, high-performance Linux server administration.
Bash historical past: A must-know software for Linux customers
Bash historical past is a built-in function of the Bash shell that routinely data the instructions you execute. This log allows you to revisit, reuse, or modify earlier instructions, saving time and lowering the probability of repeated errors.
Linux system directors, builders, and DevOps engineers typically discover themselves performing repetitive duties, troubleshooting points, or retracing their steps to debug issues. Bash historical past eliminates the necessity to bear in mind each command or write them down elsewhere. As an alternative, it acts as your terminal’s reminiscence, permitting you to:
- Enhance effectivity by repeating instructions with a couple of keystrokes as an alternative of retyping them.
- Be taught from the previous by rapidly referencing instructions used to configure methods or run scripts.
- Debug errors by tracing your steps to establish what went improper throughout a configuration or script execution.
The place is bash historical past saved?
Bash historical past maintains two most important areas for recording instructions:
- In reminiscence (session historical past): Instructions are quickly saved in RAM whereas your terminal session is lively.
- On disk (.bash_history file): Whenever you log off, the session historical past is written to the .bash_history file in your house listing, usually positioned at ~/.bash_history.
By default, bash historical past shops as much as 1,000 instructions in reminiscence and a couple of,000 instructions on disk. These limits might be adjusted to fit your workflow – extra about that in a while within the article.
High bash historical past instructions for streamlined server administration
Bash historical past offers a wealth of performance that will help you recall, filter, and reuse instructions with minimal effort. Listed below are the important bash historical past instructions and shortcuts that may prevent time and scale back errors in your workflow.
View and search bash historical past
Accessing your bash historical past is easy. Begin by typing this command:
historical pastWorking this command shows a listing of beforehand executed instructions, every with a singular quantity.
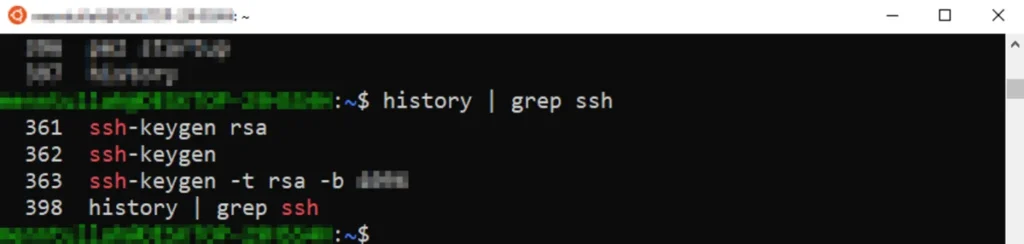
For giant command histories, you’ll be able to filter the output utilizing grep to find particular entries. For instance:
historical past | grep sshIt will show solely the instructions containing the phrase “ssh”, making it simpler to find particular operations.
In the event you’re searching for a extra interactive strategy, use the Ctrl+R shortcut to carry out a reverse search. Begin typing any a part of a command, and bash will auto-suggest matching entries out of your historical past. Press Enter to execute the suggestion or Ctrl+G to exit the search.
Clear bash historical past
Clearing bash historical past is helpful for privateness or resetting your command log throughout a troubleshooting session. To take away a single entry, Use historical past -d adopted by the command quantity like so:
historical past -d 10This removes the tenth command from the historical past.
If you wish to clear the present session and wipe the session’s reminiscence, use:
historical past -cAnd in an effort to erase persistent historical past, you’ll must overwrite the .bash_history file on the disk with an empty file:
> ~/.bash_historyKeep in mind, clearing historical past can’t be undone, so double-check earlier than utilizing these instructions.
Superior bash historical past strategies: Mastering expansions and modifiers
Now that you simply’ve acquired the fundamentals down, it’s essential to know that bash historical past is greater than a easy log of previous instructions. With a little bit of finesse, you’ll be able to wield superior options like expansions and modifiers to unlock a complete new stage of effectivity. These instruments will let you replay, tweak, and even dissect earlier instructions with astonishing velocity. Whether or not you’re debugging a script or re-running an extended pipeline command, mastering these strategies will revolutionize the way you work together with the terminal.
Unlocking bash historical past expansions
Think about typing out an extended command solely to appreciate it’s worthwhile to run it once more – or worse, run it with slight modifications. Bash historical past expansions prevent the difficulty by letting you rapidly recall and execute earlier instructions.
The !! command
Merely kind !! to execute the newest command. It’s excellent for eventualities the place a earlier command failed, and it’s worthwhile to rerun it with elevated permissions by prepending sudo:
sudo !!
The !-N command
The !-N enlargement executes the command from the historical past listing, counting backwards. As an example, !-2 replays the second-to-last command. That is helpful while you’re juggling a number of instructions and need to recall one thing current however not the final.
The !<command> command
If the start of a command you’ve used, kind !<command> to execute the final occasion of that command. For instance, !git runs the newest Git command in your historical past. This protects time when revisiting frequent operations like commits or pulls.
Utilizing phrase designators in bash historical past
Bash historical past expansions don’t cease at recalling full instructions – you should utilize phrase designators to isolate particular elements of a command. These will let you seize arguments or modify parts with out retyping every part.
The !:^ command
The !:^ designator is a robust shortcut for grabbing the primary argument of the final executed command. That is notably helpful when working with instructions that reference filenames, scripts, or sources it’s worthwhile to work together with in a number of steps.
Instance: You probably have simply compiled a program with this command:
gcc file.c -o output Typing vi !:^ will will let you edit the file.c file.
The !:$ command
The final argument is commonly essentially the most helpful a part of a command, and you’ll rapidly seize it with !:$. For instance, if you happen to simply modified directories with cd /var/www, working ls !:$ will listing the contents of /var/www.
In eventualities the place you’re working with deeply nested paths, this trick can prevent substantial time.
The !:* command
Typically, you want all of the arguments from a earlier command – like when working with a number of recordsdata or chaining duties. The !:* designator retrieves each argument from the final command, permitting you to make use of them collectively.
Think about you’ve simply uploaded two recordsdata to a server like so:
scp file1.txt file2.txt consumer@server:/pathNow you need to compress the identical recordsdata regionally? No drawback:
gzip !:*With out !:*, you’d must manually copy or retype the filenames, rising the chance of typos and losing helpful time.
Bash historical past modifiers for easy command tweaks
Modifiers will let you fine-tune recalled instructions on the fly, letting you repair typos or regulate file paths with out re-entering your complete command.
The ^outdated^new^ command
A standard frustration is realizing you made a typo in a command. With ^outdated^new^, you’ll be able to right the error and immediately re-execute the fastened command. As an example, if you happen to typed ls /hmme as an alternative of ls /residence, you can merely run:
^hmme^residence^The :h, :t, and :r instructions
These modifiers assist refine paths and filenames:
:h(head) removes the filename, leaving simply the listing path.:t(tail) strips the listing path, leaving solely the filename.:r(root) removes the file extension.
For instance, if you happen to beforehand ran:
vim /residence/consumer/file.txtThen use:
echo !!:h It will output /residence/consumer
You possibly can mix these modifiers for much more nuanced path manipulations. Bash historical past’s flexibility permits you to chain them collectively to isolate particular elements of a path. As an example, if you happen to labored on:
vim /residence/consumer/initiatives/code/file.pyAnd also you want the mother or father listing and filename with out the extension, you should utilize:
echo !!:h:tTo get initiatives.
The right way to customise bash historical past settings for optimum efficiency
By default, bash historical past saves instructions to the .bash_history file in your house listing. Nonetheless, you’ll be able to fine-tune how a lot historical past is saved and the way it behaves.
Regulate the variety of instructions saved
Bash historical past makes use of two variables to find out what number of instructions are retained:
HISTSIZE: Units the utmost variety of instructions saved in reminiscence throughout a session.HISTFILESIZE: Units the utmost variety of instructions saved to the .bash_history file.
To extend these limits, add the next strains to your .bashrc file:
HISTSIZE=5000
HISTFILESIZE=10000
This ensures you have got a bigger pool of previous instructions to attract from, particularly helpful for long-term troubleshooting or recurring duties.
Stop duplicate entries
In the event you continuously repeat instructions, your historical past can grow to be cluttered with duplicates. Use the HISTCONTROL variable to maintain issues tidy:
HISTCONTROL=ignoredupsIt’s also possible to mix choices, like ignoring duplicate and whitespace-prefixed instructions:
HISTCONTROL=ignorebothAdd timestamps to bash historical past instructions for higher monitoring
Monitoring when a command was executed might be essential for debugging or auditing. With the HISTTIMEFORMAT variable, you’ll be able to append timestamps to your historical past entries. Add this to your .bashrc file:
HISTTIMEFORMAT="%F %T "Now, while you run historical past, every command will embody a timestamp like this:
1 2024-12-13 12:34:56 ls -lThis easy addition makes it simpler to correlate instructions with occasions, comparable to logs or server crashes.
Exclude instructions from bash historical past with easy tweaks
Typically, you would possibly run instructions that you simply don’t need saved in historical past, comparable to delicate operations involving passwords. The HISTIGNORE variable enables you to outline patterns for instructions to exclude. For instance:
HISTIGNORE="ls:cd:pwd:exit:clear"This prevents frequent instructions like ls and cd from cluttering your historical past. It’s also possible to use wildcards to disregard instructions with sure traits, comparable to any command beginning with an area.
Sync bash historical past throughout a number of terminals
By default, bash historical past updates while you shut a terminal session. This may trigger points if you happen to’re working throughout a number of periods, as instructions from one terminal received’t be obtainable in one other till the session ends.
To sync historical past in actual time, use the PROMPT_COMMAND variable. Add this to your .bashrc file:
PROMPT_COMMAND="historical past -a; historical past -n"This ensures that:
historical past -aappends the present session’s instructions to the historical past file.historical past -nreads new entries from the historical past file into the present session.
With this setup, you’ll be able to seamlessly swap between terminals with out shedding observe of instructions.
Improve to Liquid Net for enhanced server administration capabilities
As you’ve seen all through this publish, mastering bash historical past can drastically enhance your effectivity as a Linux server administrator. However even essentially the most expert sysadmin wants a dependable infrastructure companion – like Liquid Net – to make sure the servers they handle are safe, high-performing, and scalable.
Liquid Net offers dependable internet hosting options, highly effective infrastructures, and professional assist to make sure your Linux servers function easily, permitting you to concentrate on innovation and optimization quite than troubleshooting and downtime. Whether or not you’re managing a single software or a fancy atmosphere, Liquid Net’s servers are optimized for velocity. From updates and safety patches to efficiency optimizations, Liquid Net’s managed internet hosting companies handle the heavy lifting.
Associate with Liquid Net in the present day and harness dependable internet hosting, cutting-edge infrastructure, and professional assist that empowers you!
The publish Bash historical past options for Linux server administration appeared first on Liquid Net.