
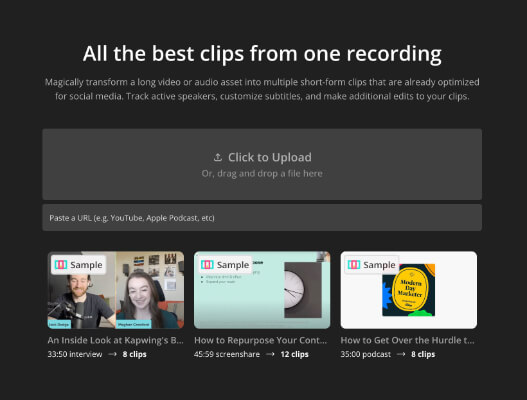
Some time again, my companion and I launched a brand new YouTube channel known as Buying and selling Card Zen.
All for a little bit of enjoyable as a result of we each love buying and selling playing cards.
We cut up the duties out. Nicola would deal with the enhancing of full size movies and I’d deal with the enhancing of quick movies.
Issues escalated moderately shortly and I quickly discovered myself with 100s of quick movies to edit.
So, I needed to get my course of labored out and quick. Earlier than the overwhelm hit me like a tonne of bricks.
And, I’m joyful to report that after 100+ quick movies and 100k+ views on this utterly contemporary channel, I had the whole lot discovered.
On this put up, I’m breaking down the whole course of so you’ll be able to implement it for your self. And most significantly, save time.
Actual footage vs faceless movies
Faceless movies are straightforward to crank out at scale. Just a few ChatGPT prompts and Canva’s bulk creation characteristic may have you in your merry approach in minutes.
This course of doesn’t work for these sorts of movies.
The movies on our new YouTube channel are movies that you may’t do with AI or any sort of shortcuts.
They contain actual footage. That features speaking head movies and something you’ve shot with a digital camera.
So, these are the forms of movies this course of works greatest for.
An summary of the instruments & the right way to use them
I’ve already posted a video on the Running a blog Wizard YouTube channel, the place I cowl an summary of the instruments I exploit on this course of and precisely the right way to use them.
So, I’d suggest giving that video a watch earlier than transferring onto the method that I’ve outlined under. It’ll assist present some context on how the whole lot works.
Additionally, make sure you like, remark, and subscribe 😉
There are a number of particular issues that I’m going over within the video (particularly in direction of the top) which can be price paying attention to. Particularly with reference to TikTok.
Step 1 – Manage your movies and group them into batches
First, we have to get our movies organized into batches. I often prefer to get movies into batches of 5-10. One thing like that.
Then, I do know that in a single enhancing session, I’ll have sufficient movies to at the least cowl me for the subsequent week or so.
A lot of the quick movies for this channel begin off simply as shorts. We’re not clipping longer movies into quick movies or something like that.
If you could try this, there are some AI-powered instruments that may aid you. Kapwing can do that with its repurposing characteristic. And that’s the device I exploit for enhancing so I’ll come again to that in a second.
There are devoted clipping instruments like OpusClip and Minvo. They are often fairly useful gizmo. However any device that generates shorts from longer movies utilizing AI goes to be a bit hit and miss. They don’t work properly for every type of movies.
Step 2 – Totally edit your first video
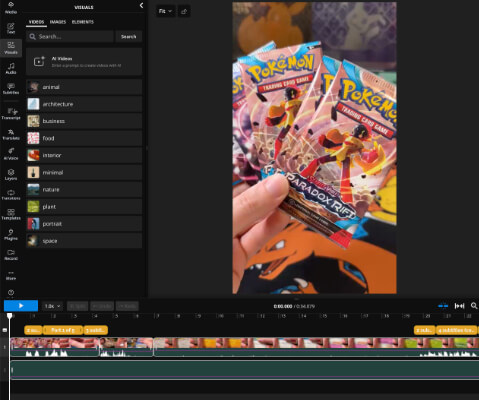
I exploit Kapwing to edit these movies. For this course of to work, you may use one other device nevertheless it helps for it to particularly be a web-based video editor. I’ll present you why in a second.
I selected Kapwing for this course of as a result of it places the whole lot I want for enhancing at my finger suggestions. There’s no want for different enhancing instruments or downloading exterior property from inventory websites like Envato Components or no matter. Every thing is there.
Inventory footage, sound results, music, pictures, templates, and many others. It’s all there. Together with the flexibility to generate subtitles robotically. I also can use AI to clip longer movies into shorts if wanted too.
Anyway, for this step within the course of we have to create a brand new undertaking in Kapwing, add our video after which get it absolutely edited.
So, I’ll sometimes:
- Set the beginning and finish factors of the video.
- Take away any components of the video that have to be eliminated.
- Add any textual content overlays if video requires it.
- Add some inventory music (hold it under 59 seconds for TikTok).
- Add a fade out to the music (to keep away from popping).
- Add every other visuals or supplementary footage. For instance, emoji’s, b-roll, pictures, and many others.
- Generate subtitles + edit them (edit the textual content and the type).
Then we are able to export the primary video and crack on with the subsequent step.
Step 3 – Duplicate undertaking + add your different movies
The primary video will set the tone for the whole lot else.
So, I’ll go to my undertaking folder in Kapwing and duplicate the primary undertaking a bunch of instances. If there are 6 movies within the batch, I’ll duplicate the undertaking 5 extra instances.
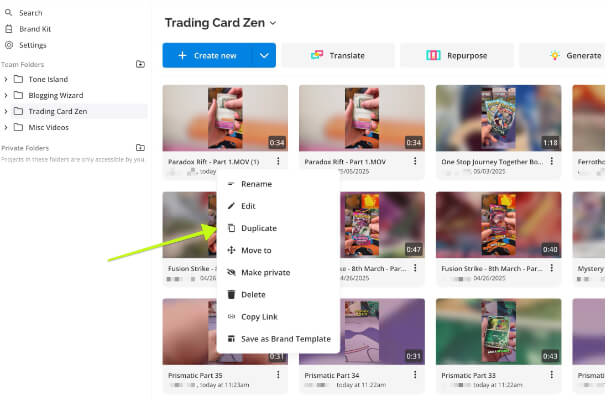
Then, I’ll open up every undertaking in a brand new tab and rename each.
I’ll additionally delete out the primary video from all of those duplicate tasks. That features deleting it from the media tab on every video.
Once we do that, we click on on the Media tab on the left panel and guarantee This Mission is chosen after we delete the primary video. We do that to ensure we’re not cluttering up our account with duplicate footage while solely preserving the footage we really need.
Then, we add the subsequent movies to every one.
So, you’d simply add your video, transfer to the subsequent tab and repeat.
By the top, you’ll have a bunch of tasks, every with the proper names and the proper movies in them. Uploaded and able to edit.
Earlier, I discussed that it was helpful doing this with a web-based video editor. Because of this.
Kapwing is pretty secure relating to having a number of tabs open which is vital for preserving this course of streamlined.
Step 4 – Full your primary enhancing & generate subtitles
Subsequent, we are going to go to the second undertaking and get all the primary edits accomplished.
The fundamental edits are pretty easy. Much like what I discussed in step 2.
So, like earlier than, we’ll set the beginning/finish factors of the video, minimize any components of the video we have to, and many others.
Any textual content we’ve added will nonetheless be there. We’ll edit that textual content primarily based on no matter this subsequent video wants.
The music will already be added. We are able to swap it out for various music if we have to. Change every other visuals like b-roll, emojis, pictures, and many others.
However the very last item we do is to generate the subtitles.
Producing subtitles takes a while. And within the time it takes, we are able to do the essential edits for the subsequent video.
So, we transfer onto enhancing the third video while the subtitles are generated for the 2nd video.
Then we repeat the identical course of for one another video on this batch.
Step 6 – Edit subtitles + export
Subsequent, we return to the second video and edit our subtitles.
Usually, Kapwing’s subtitle characteristic will work fairly properly. However it’s at all times price checking simply in case it makes any errors.
Since we’re coping with buying and selling playing cards in our movies, I’ll at all times give subtitles a fast verify.
I often scale back the character depend down so fewer phrases seem at a time. This helps to make subtitles a bit snappier.
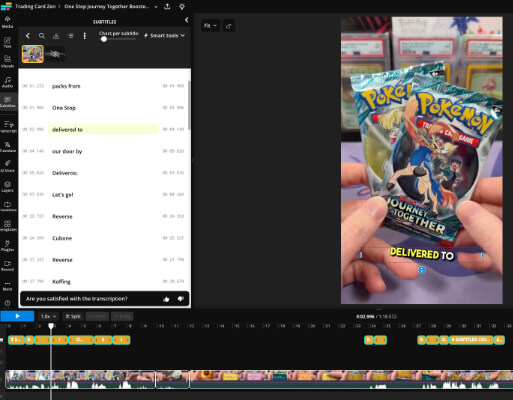
You possibly can then change the size of time sure phrases seem for (should you really feel the necessity) and make every other modifications you want.
When you’re executed with the subtitles, you’ll export the video. I often keep on with the default export settings of MP4 recordsdata and 1080P decision. Go together with no matter makes probably the most sense to your movies.
Then, we repeat the method for the subsequent video. Edit subtitles, and export.
We do that as a result of exporting movies is the opposite a part of the method that takes time. So, as a substitute of ready for the export to run, we simply edit the subtitles for the subsequent video.
And by the point we repeat this for all of the movies on this batch, we’ll be executed with the video enhancing a part of this course of.
Step 7 – Write out your social media captions & hashtags
Now, we have to put together the social media captions and hashtags that can accompany our movies.
Usually, I’ll embody:
- Caption
- Headline (for YouTube Shorts)
- Hashtags
If you happen to’re focusing on any particular key phrases, make sure you embody these in your captions & hashtags as properly. It’d assist your movies rank on social media however the jury continues to be out on that. Keep in mind – social media platforms are additionally search engines like google.
Relying on what number of movies I’ve received in a batch, I’ll both add this info to a notice and have that sitting along with my browser so I can copy & paste into my social media scheduler. Or I’ll put all this knowledge right into a spreadsheet.
Placing this right into a spreadsheet is good in case your movies are evergreen and you intend on recycling them.
Step 8 – Load your movies right into a social media scheduler
We’re on the house stretch now!
There are a bunch of social media schedulers available on the market. I exploit a number of of them.
For Buying and selling Card Zen, I exploit SocialBee. Primarily due to its category-based scheduling system & another cool options.
Click on right here to attempt SocialBee free. You’ll discover a 20% low cost code on my companion web page.
For every video, I’ll open up the put up composer and add my video.
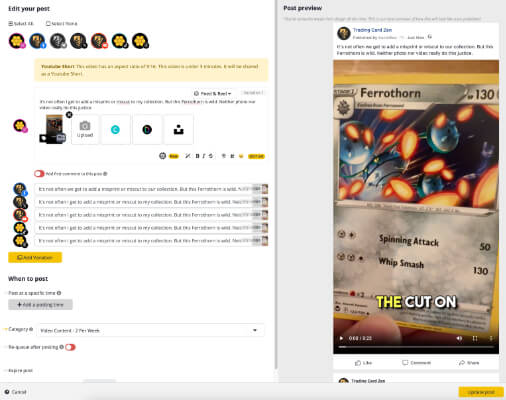
I’ll paste in my caption, then choose the choice to customize for every social community.
Right here, I do a number of major issues:
- Change Fb put up to be shared as a Reel
- Add video headline for YouTube
- Choose the general public share possibility for TikTok (I’ll additionally tick the packing containers for feedback, duets, and sew)
- Add hashtags for YouTube and TikTok
- Add a single hashtag for Threads (they’re changed into subjects now)
These are principally a private desire factor.
I generally go away hashtags out of Instagram posts as many of the hashtags I exploit for Buying and selling Card Zen overlap. This makes me really feel a bit safer within the information that I’m much less more likely to be shadow banned or no matter.
And generally our Instagram Reels will carry out the identical with or with out hashtags.
Then, I’ll select after I need the video to exit. I’ve content material classes setup with posting queues assigned already. Take a look at my video above if you would like extra particulars on how this works.
Now, this a part of the method is all about what makes issues simpler for you. I like SocialBee due to the superior scheduling options.
However different instruments can be found.
The workflow provided in Pallyy is especially good. It’s extra of a drag & drop method, so that you’d add your entire movies to your media library, then drag & drop them onto the calendar. From there, the put up editor dialogue window opens and you’ll customise how your video will likely be shared on every platform.
Remaining ideas
And that’s it. Job executed.
Now, I greatest get again to enhancing the 100s of shorts that I’ve received lined up.
However earlier than I wrap up this put up, we have to speak about video enhancing instruments one final time.
Whereas the simplicity & comfort of a device like Kapwing is vital to creating this course of as environment friendly as doable, it positively helps to familiarise your self with skilled enhancing instruments the place doable.
Particularly DaVinci Resolve.
The rationale I point out it’s as a result of it’s free. Effectively, there’s a paid model however the free model is so good that most individuals won’t ever must pay for it.
(Expensive diary, Jackpot!)
I wished to say this software program particularly as a result of after I did the display seize part of the YouTube video embedded on the prime of this put up, I observed an issue with my audio.
My display seize software program crapped out on me and solely recorded my audio in mono. Particularly within the left channel.
This was truly the second time I had a difficulty. And I’d already needed to re-record the whole factor due to a unique bug. 😅
After a little bit of pulling out my (none-existent) hair for a couple of minutes, I did a search and located there was a option to repair this challenge in DaVinci Resolve. 5 minutes later and I’d received the problem fastened and was re-exporting the video with fastened audio. Rating!
So, the lesson right here is to obtain DaVinci Resolve’s free model and hold it helpful simply in case you’ve any points that may’t be solved in a web-based video editor like Kapwing.
Disclosure: Our content material is reader-supported. If you happen to click on on sure hyperlinks we might make a fee.